Author: George – WordPress Support & Marketing Coaching

  • Troubleshooting WooCommerce: Steps to Resolve Cart Persistence Issues

    I have an old client with a precarious situation. Let me set the stage: We’re seeing some odd WooCommerce persistent cart behavior. Rather than merging the cart when signing in, it overwrites. I’ve tested numerous functions which help meet client needs in regards to how cart persistence is handled which work perfectly on my local, on the dev site, on the staging site but NOT on the live site. What is different about the live site vs these other environments? Live site has Object Caching and CloudFlare page level caching that I know of. So I tried: Turning off object caching at the host Cloudflare “Development mode” to turn off all caching temporarily I even turned of DNS proxy (as I see it a kill switch for cloudflare) All of my “next steps” are a bit volatile since it’s not something I can replicate locally or on a safe environment. I’m at a cross roads of less than ideal options so I’d welcome other ideas or suggestions. Here are some next steps down the troubleshooting path I can try: Pull Cloudflare NS entirely, wait for propagation and test (potential down time of live site) Host a copy of the site on another server to see if results persist –> feels like a waste of time because I don’t have the issue on dev/staging Start the old heave-ho by disabling plugins (on the live site :cry:) and test this live… Question: What would your next move be? What am I missing?
    A WordPress expert who supports client websites

    Troubleshooting WooCommerce is going to be complex, since there is so much to WooCommerce. Even limiting to “Cart and Checkout”, there are potential problems at several levels, including the database, WordPress core, plugins, payment processors, site security, information privacy, and more.

    1. Environment Consistency Check:
      • Confirming that the staging and production environments are identical (including PHP version, MySQL version, server configurations, and WordPress version) is crucial for accurate troubleshooting. Make sure there are no discrepancies.
      • If possible, clone the live site to a staging environment on the exact same server to replicate the environment as closely as possible.
    2. Database Synchronization:
      • Ensure that the staging database is a recent clone of the production database. This will help in reproducing the issue if it’s data-related.
    3. Error Logging:
      • Ensure that WP_DEBUG, WP_DEBUG_LOG, and WP_DEBUG_DISPLAY are configured correctly to capture any errors, warnings, or notices. Check the debug.log file, and the PHP error log, for any relevant entries that might indicate what’s going wrong.
      • See Debugging in WordPress – Documentation for these settings and where to set them.
    4. Cache Validation:
      • Although you’ve disabled caching at various levels, ensure that there’s no server-level caching or other caching mechanisms at play which could be causing discrepancies between environments.
    5. Transients:
      • Clearing transients is a good step. Corrupted or stale transients can cause unexpected behavior.
      • Transients are meant to be short term, to minimize complex database queries. So, (unless the plugin has bugs such as not using transients properly) you should be able to delete any transient at any time. If you have command line, wp transient delete --all or there are MySQL queries to delete them.
      • Transient Cleaner By David Artiss
    6. Plugin Conflict Test:
      • Although risky on a live site, disabling other plugins temporarily or doing a binary isolation (disabling half the plugins, then half of the remaining half, etc.) could help identify a conflicting plugin.
    7. Theme Conflict Test:
      • Temporarily switch to a default WordPress theme (currently Twenty Twenty-Three, or Twenty Twenty-Four is about to be released) to see if the issue persists. If the issue resolves, it could be a theme-related problem.
    8. Custom Code Review:
      • Review the custom functions you have written (if any) related to cart persistence to ensure they are coded correctly and are compatible with the live site’s environment.
      • Must pay attention to security, privacy, transients. Plus, you have to not conflict with parameters or settings of the main plugin.
      • Minimize your custom code as it requires a lot of testing and maintenance, every time the main plugin is updated.
    9. WooCommerce Configuration and Version Check:
      • Ensure that WooCommerce settings related to cart and sessions are correctly configured.
      • Check that the WooCommerce version on the live site is the same as on the staging and dev sites.
    10. Server Configuration Check:
      • Check server configurations for session handling and other server-level settings that might affect cart behavior.
    11. External Services:
      • Temporarily remove CDN such as Cloudflare from the equation by updating the DNS to point directly to the server, ensuring any changes have fully propagated. This can be risky due to potential downtime, but it could help rule out CDN caching as the culprit.
    12. Monitoring and Logging Tools:
      • Utilize monitoring and logging tools to observe the behavior of the cart during the login process to see if there’s any noticeable difference between environments. Debugging in WordPress (link above) suggests some.
    13. Support Channels:
      • Reach out to hosting support to see if they have any insights or if they can replicate the issue on their end.
      • Reach out to WooCommerce support or community forums with the detailed information about the issue to get more insights.

    Given the precarious nature of the live environment, some of these steps may come with risks or may not be viable. Each action should be weighed carefully against the potential impact on the live site. Taking a systematic, well-documented approach to troubleshooting will hopefully help isolate and resolve the issue with the least amount of disruption.

    Tip for all WooCommerce sites: never put a “live cart” on your pages; have a Link to the cart page on all your pages.

    Putting a live cart, or any frequently updated data, on a page prevents that page from getting cached. Every time the page is accessed, it must be generated again (or the page would get cached with old or “not theirs” data).

    Only work-around: you use a plugin that knows how to wait for the page to be completely loaded, and then use something (probably AJAX) to display this site visitor’s current cart, so the (private, secure) cart info never gets in the cache.

    Is having that info display so many places in your site really worth all that extra testing and maintenance work? A “See Your Cart” link is so easy.
    George Lerner

    Caches to Disable for Troubleshooting

    When debugging WooCommerce issues, it’s crucial to disable caches to ensure that you are seeing real-time, accurate results. Here are some of the key caches and caching layers to consider disabling:

    1. Browser Cache:
      • Your web browser stores static files to load pages faster. Make sure to disable browser caching or use incognito/private browsing mode to prevent old data from being displayed.
      • Many browsers have a right-click Inspector and on the Network tab there is a check-box to toggle the browser cache on/off.
    2. Page Caching:
      • Page caching is often managed by plugins or server configurations. This type of caching stores static HTML copies of your pages to serve to users, bypassing the need to generate the page from PHP and database queries, for every visitor.
    3. Object Caching:
      • This type of cache stores database queries or other objects to reduce the load on your database and speed up page loading times.
    4. Database Cache:
      • Some hosting platforms or plugins provide database caching to speed up database query times. Make sure to flush or disable this cache to ensure you’re seeing up-to-date data.
    5. CDN (Content Delivery Network) Caching:
      • CDNs like Cloudflare cache static content across their network to reduce loading times. Disable CDN caching or put it in development mode to prevent old content from being served.
      • WooCommerce pages like the shopping cart and the checkout pages should never be cached. That information must be private and current. Make sure all plugins you use, know how to prevent these pages ever getting cached.
    6. OPcache:
      • PHP’s OPcache speeds up PHP by storing bytecode in memory, preventing the need to re-compile PHP scripts on each request. Resetting or disabling OPcache might be necessary for debugging.
    7. Varnish Cache:
      • If your server or hosting provider uses Varnish, ensure it’s disabled. Varnish is a powerful HTTP cache that can mask issues.
    8. Server-Level Caching:
      • Check with your hosting provider to see if there’s any server-level caching enabled and if so, request to temporarily disable it while debugging.
    9. Transient Caching:
      • WordPress transients are used to store cached data temporarily. While not a traditional cache, corrupted or outdated transients can cause issues.
    10. Full Page Caching Plugins:
      • If you are using any full page caching plugins, ensure that these are deactivated during the debugging process.
    11. Asset Optimization Plugins:
      • Plugins that minify or concatenate CSS and JavaScript files also have a sort of caching mechanism. Ensure these plugins are deactivated during debugging.

    By ensuring that these caches are cleared or disabled, you can eliminate caching as a variable when troubleshooting and ensure you are viewing the most recent, un-cached version of your WooCommerce site.

    Always remember to re-enable these caching mechanisms once you’re done troubleshooting to ensure your site operates efficiently.
  • Enhancing Email Deliverability for Your WordPress Website

    Ensuring seamless communication between your business and your customers is crucial. One important aspect of communicating is the “deliverability of emails” sent from your WordPress website.

    These emails include WooCommerce order confirmations, password reset requests, or any other transactional emails.

    Here are some key steps to consider, to enhance the email deliverability for your WordPress website:

    1. Utilize an SMTP Plugin:
      • Many email providers require proper validation to ensure that you (or in this case, your website) are the authorized sender of the emails. Utilizing an SMTP (Simple Mail Transfer Protocol) plugin such as WP Mail SMTP can facilitate this by connecting your WordPress website to a reputable email hosting service.
    2. Choose a Reputable Email Host:
      • Good email hosts like GMail, Outlook, Brevo, and Zoho Mail are preferred as they have robust mechanisms to ensure email deliverability. They require setting up specific email authentication records like DMARC, DKIM, and SPF which help in verifying the sender’s identity.
      • Sending emails from your website is not as good, even if your website hosting company also provides email hosting. Email hosting is an “aside” for website hosting companies; pay the small monthly fee for an excellent email host.
    3. Email Authentication:
      • Set up necessary email authentication records:
        • SPF (Sender Policy Framework): Helps prevent email spoofing by specifying which IP addresses are allowed to send emails on behalf of your domain.
        • DKIM (DomainKeys Identified Mail): Allows receiving email servers to confirm that an email claiming to come from a specific domain was authorized by the owner of that domain.
        • DMARC (Domain-based Message Authentication, Reporting & Conformance): Builds on SPF and DKIM protocols, adding linkage to the author (“From:”) domain name, published policies for recipient handling of authentication failures, and reporting from receivers to senders, to improve and monitor protection of the domain from fraudulent email.
        • Your email hosting company can guide you in how exactly to configure these, for settings on their system and settings with your Domain Name Registrar.
    4. Configure Your Domain Properly:
      • Ensure your domain name settings (DNS records) are correctly configured with your email provider to ensure smooth email deliverability. Tools like MX Lookup Tool – MxToolbox can help verify your DNS settings.
    5. Avoid Sending Emails from Hosting Provider:
      • It’s often not advisable to send emails directly from your website hosting server (unless it’s specifically configured for email hosting). Doing so may lead to poor email deliverability.
    6. Monitor Email Deliverability:
      • Use tools and services that provide insight into your email deliverability performance, such as open rates, bounce rates, and spam complaints. This data can provide valuable insights and alert you to potential issues before they affect your communication with your customers.
    7. Maintain a Clean Mailing List:
      • Regularly update and clean your mailing list to remove invalid or inactive email addresses. This will help improve your sender reputation and overall email deliverability.
    8. Stay Updated on Best Practices:
      • Email deliverability standards and best practices evolve. Stay updated on the latest recommendations and ensure your WordPress website’s email configuration remains compliant and optimized for deliverability.

    By taking these steps, you will significantly improve the chances of your emails reaching your customers’ inboxes, thereby ensuring better communication and enhancing customer satisfaction.

    Should you have any further questions or need assistance with improving your email deliverability, feel free to reach out to me or leave a comment.

  • How to Fix Authentication Problems on FileZilla Linux — Too many authentication failures

    This is for FileZilla on Linux Mint (and probably other Linux), as of September 2023 (FileZilla 3.65.0).

    I want to connect securely, so I always use SFTP instead of insecure FTP. You should always use SFTP, or transfer files via an SSH connection. 

    FileZilla though doesn’t know how to not send an SSH key if you don’t specify one. 

    If you turn on Debug (Edit, Preferences, Debug) you can see what is generating the authentication failures. FileZilla is trying every SSH key you have, even though you didn’t say to send any SSH keys. The server disconnects you after too many attempts. 

    What is FileZilla’s Problem?

    FileZilla doesn’t know how to send only the SSH keys you specify, to the hosts you try to connect to. Definitely a bug, they should fix that. 

    So, every site you attempt to connect to, gets every SSH key in your ~/.ssh folder (or rather, all the ones in the .ppk format FileZilla understands). After too many attempts, the remote server disconnects you. 

    How to Fix It?

    There are many sites and many questions on FileZilla’s support boards about how to get FileZilla working. The main suggestion is “temporarily move your ~/.ssh folder”. But you would have to do that every time you want FileZilla to connect to your servers that don’t use SSH keys. 

    I finally found someone who understood the problem. See the reply by “vincitus” on Not possible to disable SSH public key authentication? – FileZilla Forums. 

    Installing Latest FileZilla

    Download the latest version from FileZilla Downloads, since the version in the Mint Repository is ancient.

    How to install FileZilla FTP client in Linux | Web Developers Planet 

    Make sure you have the  dependencies

    sudo apt-get install libfilezilla-dev libwxbase3.0-dev gnutls-dev libdbus-1-dev

    You don’t have to compile it, the .xz download file is ready for Linux Mint.

    cd ~/Downloads
    sudo tar vxf FileZilla_____.xz
    [substitute the file name for the version just downloaded]
    sudo cp -r FileZilla3 /opt/
    cd /opt/
    sudo chown -R root:root FileZilla3/

    Starting FileZilla (normally)

    Put this in your System Menu. (Right-click the “LM” tray icon, Configure, “Menu” tab, “Open the menu editor”, in the Internet section click “New Item”

    /opt/FileZilla3/bin/filezilla

    Starting FileZilla w/o SSH Keys

    Start FileZilla with an Environment Variable mis-set to not access SSH. 

    Edit your ~/.bashrc file to add this line (at the end is fine, or with other “alias” lines)

    alias fz="SSH_AUTH_SOCK=null  /opt/FileZilla3/bin/filezilla &  "

    I called the alias “fz” for “FileZilla”, you can name it how you want (but no spaces in the name). 

    What that command does is remove the SSH setting for only this terminal session, and run FileZilla. That ‘&’ at the end says to immediately give you access to the terminal (FileZilla launched in the background). Without the SSH_AUTH_SOCK setting, FileZilla doesn’t know how to access your system’s SSH keys, so it can’t send them to the remote servers you connect to.

  • Audio Equipment

    “Life Force: How New Breakthroughs in Precision Medicine Can Transform the Quality of Your Life and Those You Love”. “In this book, Tony Robbins brings you more than 100 of the world’s top medical minds and the latest research, inspiring comeback stories, and amazing advancements in precision medicine that you can apply today to help extend the length and quality of your life.”

    I really like the JBL Flip 4 cylindrical speaker. It delivers amazing sound quality for listening to music, the battery lasts a good time, it is water-resistant, and it is easy to carry. 

    JBL Flip 4 Replacement Battery

    QaoMrt 4000mAh High Capacity Replacement Battery with Repair Tool Kit
    Compatible with JBL Flip 4, Flip 4 Special Edition, GSP872693 01 Speaker 

    From the product description:
    Upgraded the original capacity from 3000mAh to 4000mAh.
    Our Flip 4 battery has a standard test report from ILAC ISO 17025 certified laboratory. And we use the latest high-quality smart IC chip, which has the short-circuit protection, over-heating protection, over-charging protection, over-discharging protection, effectively improves power conversion rate and stable performance.
    KEEP THE ORIGINAL WATERPROOF PERFORMANCE: Whether the replacement will affect the original waterproof performance of the speaker must be one of the factors you will worry about. We deeply understand your concerns. After the replacement process, you don’t need to worry about rain or splash, and daily use will not be affected. At the same time, both ends of the GSP872693 01 battery replacement are equipped with anti-vibration sponges, which can avoid vibration noise even at the maximum volume.

  • What is a Great Theme to use for Your Site?

    “Any recommended theme to use for building landing pages for lead generation?”

    A WordPress marketer

    My Theme Recommendations

    Use the TwentyTwentyThree theme with the Block Editor. As the default WordPress theme, it is the most tested, secure, well-written theme.

    Use Full-Site Editing and Block Patterns. WordPress 6.3 makes this so easy.

    You can specify your color palette and font palette in a TwentyTwentyThree child theme, with theme.json. Or you can set them in the Customizer using a good user interface. Once you have your palettes set, only use the colors and fonts you already picked. If you alter one of the colors in your palette, anywhere you used that “color position” in the palette will use the new color, automatically.

    Themes Straddling the Page Builder Capabilities

    You will likely find the Block Editor alone is able to do everything you want for a page.

    Great block designs are available in the Pattern Directory. And, you can get well-designed patterns as a plugin, with great user interface and great programming.

    A great enhancement to the Block Editor is a free plugin Spectra – Free WordPress Page Builder or in the WordPress Plugin Repository Spectra – WordPress Gutenberg Blocks (by Astra’s author Brainstorm Force). Spectra works entirely in the Block Editor settings panel you already use. The result is low-resource blocks and only the minimal CSS or JavaScript needed for the page; most page builders add many JavaScript files to every page that uses the page builder at all, or even on every page on your site. You can use Spectra on any full-site editing theme, though of course it works great with TwentyTwentyThree and Astra.

    Other top recommendations for theme + almost-page-builder: get either the free (from WordPress Repository) or paid version of either Astra https://wpastra.com/ or Kadence https://www.kadencewp.com/ . These are both well-liked in the AZ WordPress Meetup.

    Full Page Builders

    You can use Elementor, or Beaver Builder, or the Divi Builder with either of these themes. Yes, that is my order of preference; I used to use Divi but Elementor is easier to work with. (Don’t use the Divi Theme, it is simply not nearly as good; it comes bundled with the Divi Builder, but ignore it.)

    You might find this helpful:

    Advanced Layouts with the Block Editor | Learn WordPress https://learn.wordpress.org/workshop/advanced-layouts-with-the-block-editor/

    How to create a Landing Page with WordPress https://wpastra.com/guides-and-tutorials/create-landing-page-wordpress/

    Layout Recommendation

    Put more attention on good writing for your very specific ideal customer, than you put on “fancy layout”; you will (for most customers) find that a simple, clear, easy to read and use page, is what works best.

  • Editing theme.json and Your Site Editor is Black on Dark?

    Editing theme.json and Your Site Editor is Black on Dark?

    Optimizing WordPress 6.3 Child Theme: Editing Theme.json File for Default Site Colors

    Setup: Using WordPress 6.3.__ with a TwentyTwentyThree child theme, editing the child theme’s theme.json file.

    I didn’t want the theme default colors to show, so I turned them off in theme.json

    I didn’t like the color name ‘base’ in the color palette, so I changed it. 

    “Waaa, what happed to my site editor?”

    Must set your default site colors

    I submitted a bug report https://github.com/WordPress/gutenberg/issues/54517 :

    Site editor background-color: #1e1e1e if theme.json styles.color not set and settings.color.palette missing base color in TT3 #54517

    If theme.json defaultPalette is false, and settings.color.palette doesn’t have slug ‘base’, the Site Editor displays with background-color: #1e1e1e; and text color black, illegible.

    Suggestion: Add error-checking, so :
    if settings.color.palette is missing a ‘base’ color, and
    defaultPalette is false, and
    styles.color doesn’t have both a color and background-color set, then
    set styles.color so the site editor is readable.

    For a light theme, black on blanchedalmond is readable but designers would wonder “where did that color come from”.

    Suggestion: Add documentation to https://fullsiteediting.com/lessons/theme-json-color-options/ giving the impacts of not having palette color ‘base’ and not having styles.color set.

    Perhaps “Your Site Editor background color and text color are set from the settings.color.palette ‘base’ and ‘contrast’ colors. If you don’t define them, the Editor colors are taken from styles.color (so you should define one or both of these text and background colors).”

    Set your Site Default Colors

    Theme.json set styles.color

    "color": {
      "text": "#000000",
      "background": "blanchedalmond"
    },

    Now the Site Editor background is blanchedalmond. You can set this to whatever colors you like, but you definitely should set it. 

    Use the Recommended Color Palette names

    If you use the color palette names that TwentyTwentyThree uses, and you then change the site’s theme, those elements styled using those basic colors will look good. 

    https://fullsiteediting.com/lessons/theme-json-color-options/ How should I name the colors?
    “It is recommended to use base and contrast followed by primary, secondary, tertiary, and so on as the color slug and name.”

    You can have the name be whatever makes sense, but you really should not change the slug.

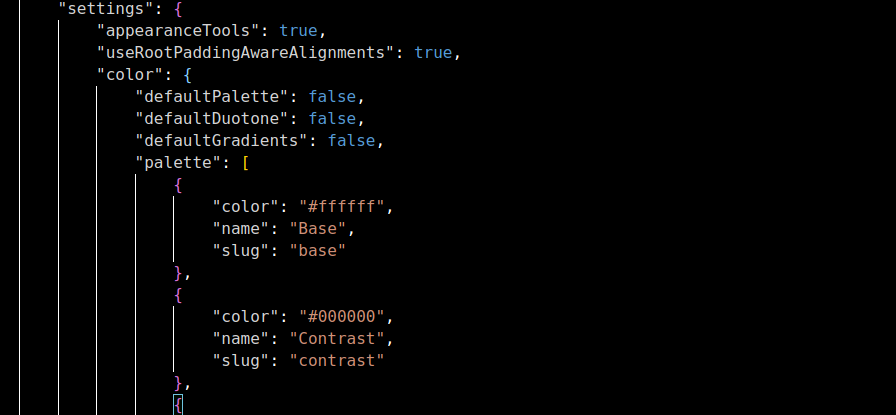
    settings.color.palette should start with this:

    				{
    					"color": "#ffffff",
    					"name": "Base",
    					"slug": "base"
    				},
    				{
    					"color": "#000000",
    					"name": "Contrast",
    					"slug": "contrast"
    				},
    

    Rules for theme.json editing:

    “Always set styles.color, both color and background-color; they are used throughout most themes as the default color, for example in the Site Editor and Page Editor editing area.”

    “For child themes, keep the slugs of the ‘most basic’ colors of the parent theme; in TwentyTwentyThree these are ‘base’ and ‘contrast’ (with other recommended slugs: ‘primary’, ‘secondary’, ‘tertiary’). You could get unexpected colors in places, since the theme designers likely expected those color slugs are set.”

  • Email Attachments Made Easy — Reliable Delivery Strategies

    I do the scheduling of the flood irrigation for our street, sending out an email every 2 weeks to 75 people. It consists of a JPEG (different each time), then a standard message pasted from my clipboard, and then the schedule as a pdf. 

    Then, when my preset alarm would sound, I could send it from my phone no matter where I was.

    Since I upgraded, I make up the email on my computer, and it is saved as before and shows up on my phone, except that the JPEG and PDF do not show up on my phone, only the text shows up. When I send from the phone, all that sends is the text.

    It doesn’t make any difference if I attach the JPEG and PDF, or drag and drop them.

    If I send it from my computer, all 3 will send.

    Hopefully someone out there will know if there is some little box or something that has to be checked or unchecked.

    A mystified computer user

    There are several things that affect email attachments getting delivered with your emails.

    1. Attachment Issues: It’s possible that the attachments you’re including in your emails are getting blocked during the delivery process. Here are some potential reasons to consider:
      • Display Images: Most email reader programs have a feature to reduce Internet download size and increase privacy, by not download images until you click “display images” or similar.
      • Attachment Size: Many email providers, including Hotmail/Outlook, have limitations on the size of attachments that can be sent. If your JPEG and PDF files are too large, they might not be getting through. You could try using cloud storage links, such as Dropbox or Google Drive, for larger attachments and provide the link in your email.
      • Attachment Format: Some email services might block certain attachment formats. To ensure compatibility, you might want to consider using widely accepted formats for your attachments. JPEG is “standard” but some graphics programs might use non-standard headers or formats. PDF is “pretty standard”, check the options in your software so nothing not necessary is included.
      • Spam Considerations: Attachments with large images and minimal text can sometimes trigger spam filters. To avoid this, try balancing text and image content in your emails.
      • Check Email Headers: Check the “source code” or “headers” of the email you receive, it usually mentions problems with emails. There are Email Header Analyzers online.
    2. Email Service Providers: Hotmail and Yahoo are known for their deliverability challenges and high spam rates. For more reliable email delivery and a more professional appearance, consider switching to more reputable providers like GMail (part of Google Workspace) or Zoho Mail. These providers offer advanced security features and better deliverability.
      • Domain Reputation: If you have a domain name, configure your domain’s email settings (MX records, DKIM, SPF) to send emails via GMail or Zoho. This can help improve the credibility of your emails and reduce the chance of them from being flagged as suspicious.
      • “Send Later” Feature: Both Zoho Mail and GMail offer a “send later” feature, allowing you to prepare emails in advance and schedule them for sending at a specific time. This would help reduce the steps you have to take for sending these emails.
    3. Website Integration: Moving your irrigation schedule information to a website, particularly using a platform like WordPress, could offer several benefits:
      • Publication Control: With WordPress, you can schedule the publication date and time of your content. This ensures emails go out when you want, without you having to manually send them.
      • Display Flexibility: Websites provide better control over page layout compared to emails. You can design your content using text, images, all of WordPress elements, creating a more engaging experience for everyone. Have the PDF as a “download link”. You probably want to have all the information that is in the PDF also be in WordPress as text and images.
    4. Email List and Newsletter Services: Consider using email list and newsletter services for improved deliverability and professionalism. Services like Brevo, AWeber, GetResponse, and MailChimp offer features to enhance your email campaigns. You can create professional-looking emails, manage subscribers, and increase the chances of successful email delivery.
      • Integration with WordPress: Many of these services integrate seamlessly with WordPress. You can use plugins (most of them are free) to gather subscribers from your website and design emails directly within the WordPress interface.

    These suggestions should provide you with a clearer path forward, to address your email challenges. If you have any further questions or need assistance with any of the solutions mentioned, please contact me, I’m here to help.

  • Advanced Prompt Techniques: Generating Words Beginning with a Specific Letter

    Advanced Prompt Techniques: Generating Words Beginning with a Specific Letter

    There are plenty of questions you can ask of ChatGPT where it gives answers that match the meaning of what you asked, but not all the details. Asking for words that start with a certain letter is one type of question that ChatGPT often ignores.

    7 advanced ChatGPT prompt-writing tips you need to know by ZDNet gives some great ways of making prompts.

    Tip 7 starts with simple prompt “Word similar to devolve that begins with a B”.
    It gives words with similar meaning, but start with differing letters.

    Then he realizes that the word “devolve” has several meanings, so specify which one: Generate a verb that starts with the letter “B” and has a similar meaning to “devolve,” specifically indicating the idea of something deteriorating or getting worse.

    Tip 7 is about having ChatGPT keep trying its initial result until it finds an answer that meets additional criteria: 

    Perform the following steps until step 3 is resolved: 
    1. Generate a verb that starts with the letter "B" and has a similar meaning to "devolve," specifically indicating the idea of something deteriorating or getting worse.
    2. Determine the first letter of the generated verb
    3. If that letter is not "B", repeat steps 1 and 2

    That is a very useful technique!

    And, for this query there is an easier approach: Ask it to match the meanings, in its language, and then find those that match your English spelling requirements.

    Generate verbs that have a similar meaning to "devolve", specifically the meaning of something deteriorating or getting worse. Then select those words that in English start with the letter "B".

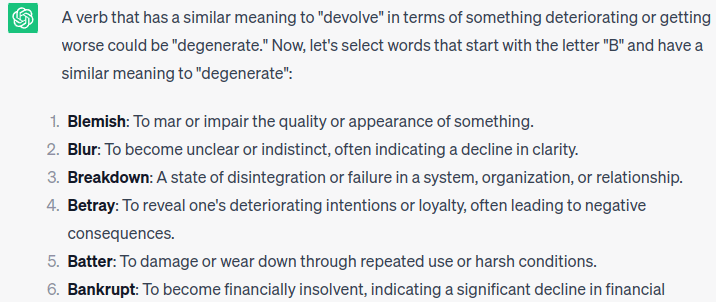
    ChatGPT 3.5 gives several answers that all match, on the first try.

    A verb that has a similar meaning to "devolve" in terms of something deteriorating or getting worse could be "degenerate." Now, let's select words that start with the letter "B" and have a similar meaning to "degenerate":

    1. **Blemish**: To mar or impair the quality or appearance of something.
    2. **Blur**: To become unclear or indistinct, often indicating a decline in clarity.
    3. **Breakdown**: A state of disintegration or failure in a system, organization, or relationship.
    4. **Betray**: To reveal one's deteriorating intentions or loyalty, often leading to negative consequences.
    5. **Batter**: To damage or wear down through repeated use or harsh conditions.
    6. **Bankrupt**: To become financially insolvent, indicating a significant decline in financial stability.
    7. **Blight**: To cause harm or deterioration, often used to describe the negative impact on plants and environments.
    8. **Brutalize**: To treat someone or something in a harsh and degrading manner, leading to a decline in their condition.
    9. **Besmirch**: To tarnish or damage the reputation or purity of something.
    10. **Becloud**: To obscure or make something unclear, contributing to its deterioration.

    Please note that while these words share a similar meaning to "devolve" in terms of deterioration, they might have slightly different nuances or contexts.

    Sometimes thinking of how ChatGPT stores knowledge, helps you make a good prompt. You will often need to combine several advanced prompt techniques.

  • What Antivirus Should I Use?

    A client said she has “a family plan on AVG virus protection for all my computers”, and the renewal is coming soon, what should she do?

    AVG has been one of the best regarded anti-virus programs for years. 

    If you like it (the user interface, the way it tells you information) keep it. 

    If you want to use the free version, that’s fine too. Look at what the paid version offers that the free one doesn’t and pick.

    What you can’t do is have no antivirus software running. You need it, on each computer and on each phone.

    AVG is one of their recommended programs. If you hear of some “other, better” program, and it isn’t on PC Magazine’s list, keep away. There are so many good programs they have reviewed, there is no reason to use one they haven’t reviewed.

    And maybe PC Magazine didn’t publish a review because the “better” software is actually terrible or a hacker’s program. For that reason, only download critical software from the author’s website.

    https://www.pcmag.com/picks/the-best-antivirus-protection

    and 

    https://www.pcmag.com/picks/the-best-free-antivirus-protection

    PC Magazine does include reviews of antivirus programs for Windows, OS/X, Linux, iPhone, Android. Most of the top-reviewed programs run on all your devices, with one subscription.

  • Google Authenticator codes not updating

    Google Authenticator codes not updating

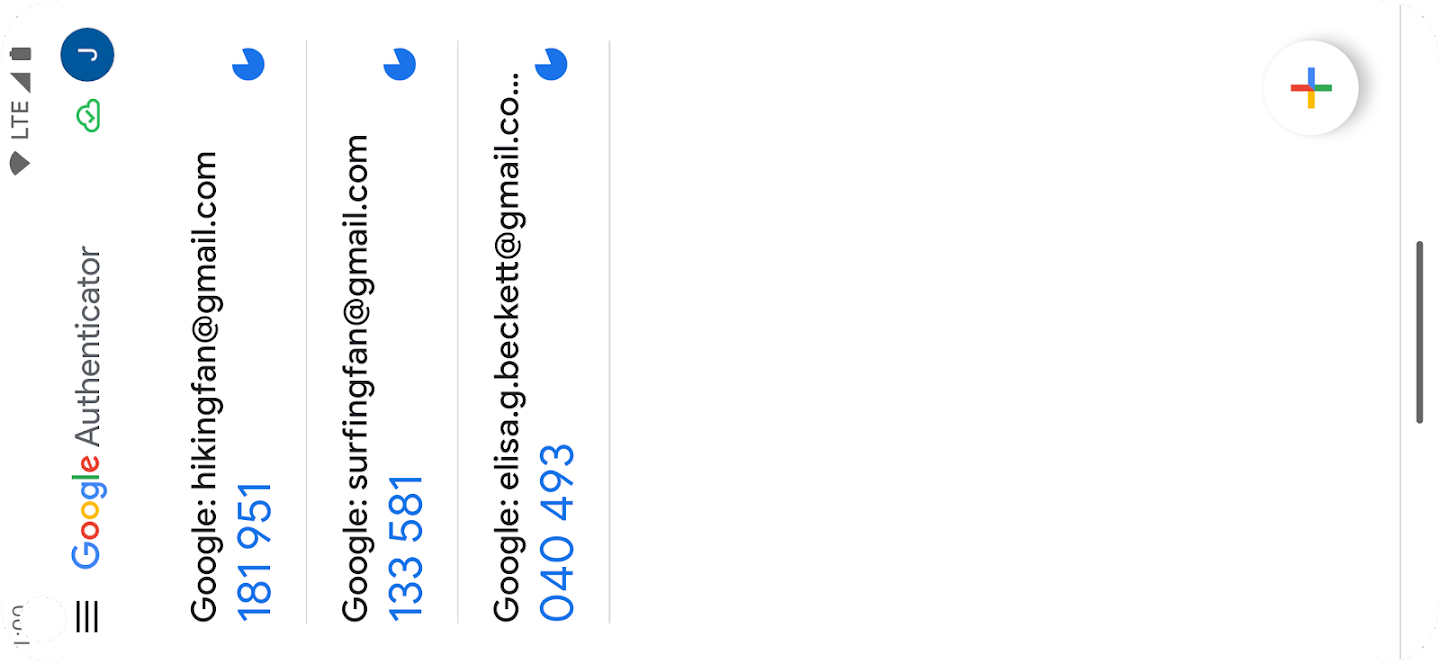
    Google Authenticator is a common Two-Factor Authentication (2FA) app for mobile phones. When you log into a website, it asks for a code, you get the code from your 2FA app, type that code into the website form.

    I’m using Google Authenticator and Authy. Why both? I had Authy already, and it works great, and then started seeing Google Authenticator is popular, so I simply added it also. Either should work for all your sites.

    WordFence (my favorite WordPress security software), has 2FA as one of its many features, and connecting with Google Authenticator is built-in.

    Now that I have 2FA set up for a few accounts, the code often doesn’t work. Huh?

    The codes expire quickly. Google Authenticator shows a “decreasing pie” icon; the code expires when the pie is “all eaten”. You’d think the code would automatically update. But it doesn’t.

    On my old phone, the code doesn’t always update when I start the app, either.

    Updating Your Authenticator Codes

    Updates are paused while they are visible. I’d prefer noticing a code is about to expire and wait for it to refresh before typing it into a website, but okay, they are paused.

    To update the code, finger-hold (or very-long-tap) for a few seconds on any of the codes, and all the codes will get updated.

    It is that simple.

    p.s. The other thing many sites say to do is check the app’s settings, refresh the “Time correction for codes”, the time on your app should be synchronized with the “real time”, but they can get out of synch. This time is different from your phone’s clock (resetting the time correction doesn’t change your phone’s time). If this “time correction” setting fixes your problem with 2FA, you could check your phone’s time is being updated, normally to your phone network clock.

  • wp-cli errors, plugins need newer PHP?

    Is your wp-cli using an old version of PHP, older than WordPress runs in? If you get errors in wp-cli, for example with wp plugin list, about a plugin needing a newer version of PHP, this is how to fix it (temporarily).

    Sometimes website hosting companies upgrade your WordPress PHP version, but fall behind updating the PHP version for your SSH terminal connection to the site.

    The long-term solution is get your hosting company to update the ssh version of PHP.

    Boo, hiss to those negligent website hosting companies. They should always keep PHP versions updated, at least above the minimum recommended version for WordPress. In June 2023, that minimum is PHP 7.4.
    It is currently very common now for sites to be running on PHP 8.1 or newer.
    Even though the recommended minimum version of PHP for WordPress is PHP 7.4, I suggest don’t run WordPress anymore on PHP older than PHP 8.1, and it’s better to be using PHP 8.2 or newer.

    Plugin authors are starting to use the good enhancements in newer versions of PHP, setting their minimum PHP version to 7.4. Good for them!

    This error is not the plugin author’s fault. It is the hosting company’s fault, for still having an old version of PHP in use.

    Here is the full error message for one plugin, but understand that each plugin will have a different message. The important part is this: dependencies require a PHP version ">= 7____" whatever the version number is.

    Fatal error: Composer detected issues in your platform: Your Composer dependencies require a PHP version ">= 7.4.0". You are running 7.3.33-1+0~20211119.91+debian9~1.gbp618351. in /_____/wp-content/plugins/woo-store-vacation/vendor/composer/platform_check.php on line 24

    That site’s SSH terminal is running PHP 7.3.__ (even though WordPress on that site is using PHP 8.1), while the plugin requires at least PHP 7.4.

    Solution (the hard way):

    Change the wp-cli command to tell it to skip running the plugins that require a newer PHP. This is harder because you have to type so many characters for so many commands.

    For example, change wp plugin status to

    wp plugin status --skip-plugins=ti-woocommerce-wishlist,woo-store-vacation
    

    That “skip plugins” is a comma-separated list of the folder names of the plugins that require a newer version of PHP than your hosting company provides for your SSH terminal.

    Remember, if WordPress itself is being run in too old a PHP version, this won’t fix it. Have your hosting company run WordPress in a newer version of PHP, minimum version 8.1. If they can’t do that, eww, move to a better hosting company!

    How do you get a list of the plugins that need to be excluded? It’s right there in that error message. See “wp-content/plugins/woo-store-vacation/” in the error?

    So in this case, –skip-plugins=woo-store-vacation

    If you run wp plugin status again, you may see another plugin that has the same issue. Next time I ran that command, I saw “wp-content/plugins/ti-woocommerce-wishlist/” so, the new command includes --skip-plugins=ti-woocommerce-wishlist,woo-store-vacation .

    Everything from “/plugins/” to the next “/”, and separate each of them with a comma and no spaces. The order of the plugins doesn’t matter.

    Which wp-cli commands need this?

    Many of them. Most of the commands that I use every time I am updating plugins and checking every plugin is okay and every administrative user is okay.

    What is the Easy Way?

    Instead of modifying each wp-cli command, tell wp-cli to always use the settings you need.

    You can set global settings for wp-cli in a wp-cli.yml file in the WordPress root folder.

    The documentation for this is in Config – WP-CLI – WordPress.org .

    The hosts I use happen to all have nano as the text editor. Ask your hosting company what text editor to use.

    Navigate to your WordPress root folder (the folder with wp-admin/ and wp-content/ ). Edit wp-cli.yml (you are likely making a new file, so it is empty, unless you created one before).

    nano wp-cli.yml

    Add a line like this, adjusting it to exclude your set of plugins:

    
    skip-plugins: ti-woocommerce-wishlist,woo-store-vacation

    Save that file, and you’re done.

    Now, simple wp-cli commands such as wp plugin list should work normally.

  • Asking ChatGPT for WordPress Block Editor format

    Asking ChatGPT for WordPress Block Editor format

    If you get content generated with the correct formatting commands, from ChatGPT or any other source, you can paste it into WordPress not as text, but as paragraphs, headings, lists, code, containers, quotes.

    You can train ChatGPT to deliver a long article in pieces, and have special formatting for a piece. For example, a container with two columns, with text in the left column and an image on the right.

    To train ChatGPT, I took examples of different blocks made by WordPress. I viewed a block in the Code Editor, copied it and pasted it into ChatGPT. After a few rounds of “no, I don’t want you to repeat this to me, this is the format I want you to learn” I got what I wanted.

    (ChatGPT is like a naive genius child, it often doesn’t understand you, with a lot of words. So, ask a different way until you get what you want. Also, remember to use what it says as a 1st draft; you have to go over what it generates to make sure it wrote well, without misunderstanding you or including things you wouldn’t say.)

    Along the way, I found that Heading level 2 uses one format,
    <!-- wp:heading -->,
    but subheadings, with higher heading levels, require an additional parameter. For example an H3 heading needs this:
    <!-- wp:heading {"level":3} -->
    (otherwise, the Block Editor has to “attempt recovery”).

    Finally, ChatGPT gave me results I could paste directly into WordPress.

    Then, I asked it to give a succinct way to instruct it what format I wanted.

    It gave a good answer. Then I asked “Can you remember for my account, what “WordPress Block Editor format” is? Or should I paste what you said for each new article?”

    As an AI language model, I don’t have access to personal account information or the ability to remember specific details about individual users. Therefore, I cannot remember the specific details of your account or preferences.
    To ensure accuracy and consistency, it’s recommended to refer to the provided HTML code snippet or the guidelines mentioned earlier [see below] when working with the “WordPress Block Editor” format for each new article. By using the provided example and instructions, you can follow the proper syntax and structure for creating content in the WordPress Block Editor.

    ChatGPT

    You can use this to tell ChatGPT how you want it to output the article you are going to have it write.

    Here’s what it said.


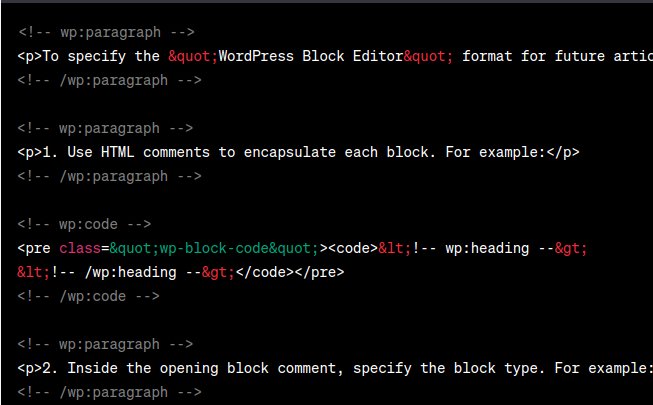
    To specify the “WordPress Block Editor” format for future articles, you can follow these guidelines:

    1. Use HTML comments to encapsulate each block. For example:

    <!-- wp:heading -->
    <!-- /wp:heading -->

    2. Inside the opening block comment, specify the block type. For example:

    <!-- wp:heading -->

    3. To add attributes to a block, include them within the opening block comment. For example:

    <!-- wp:heading {"level":3} -->

    Using <!-- wp:heading {"level":3} --> for H3 headings, <!-- wp:heading {"level":4} --> for H4 headings, and <!-- wp:heading {"level":5} --> for H5 headings is the correct syntax to set the appropriate heading levels in the WordPress Block Editor format.

    4. Add content within each block using appropriate HTML tags. For example:

    <!-- wp:paragraph -->
    <p>This is a paragraph block.</p>
    <!-- /wp:paragraph -->

    5. Maintain proper indentation and spacing for better readability.

    6. If you want to include multiple blocks within a container or column layout, nest the appropriate block comments and HTML tags accordingly.

    7. Remember to refer to the WordPress Block Editor documentation for additional block types, attributes, and features that you can use to customize your content.

    So, you don’t tell ChatGPT “write me an article on _____”. You say “write me an article on _____ in this tone of voice, with about this many words. I want the article formatted for the WordPress Block Editor, and here is how to do that: (and you paste that entire set of guidelines, all 7 points).